DIY Vector Network Analyzer: A Cost-Effective Solution for RF Measurement
In the realm of vector network analyzers (VNAs), enthusiasts and professionals alike often face a daunting choice between two main types of commercial offerings. On one hand, there are the relatively inexpensive models that come with limited capabilities, making them suitable only for basic tasks. On the other hand, there are full-featured VNAs that provide extensive functionalities but come with a hefty price tag that can be intimidating. This disparity leaves a noticeable gap in the market, particularly for those requiring high-quality performance in the microwave frequency bands.
However, a compelling solution has emerged through the ingenuity of [Henrik Forsten], who took on the challenge of building his own VNA. This innovative project not only showcases his technical skills but also highlights a growing trend among DIY enthusiasts who seek to bridge the gap between affordability and performance. Henrik's latest build has garnered even more admiration than his previous endeavor, thanks to significant improvements and fixes that address the shortcomings of his earlier design.
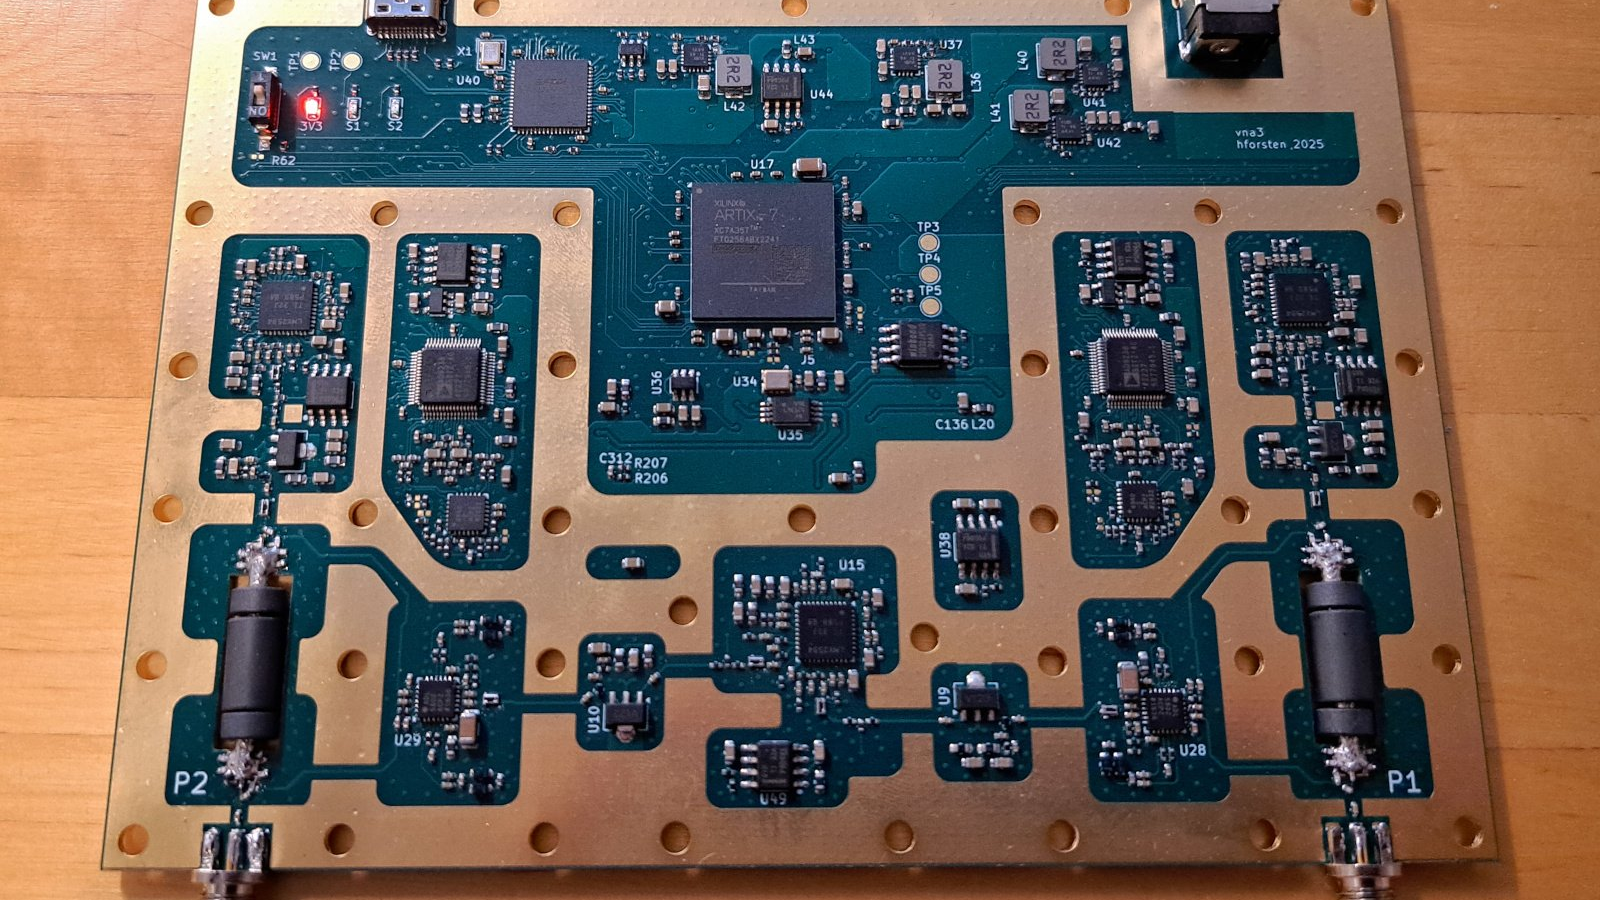
One of Henrik's primary goals was to keep the project budget-friendly while still achieving precise measurement capabilities. This required careful planning and some necessary compromises in design. The Bill of Materials for this impressive creation includes dual-channel broadband RF mixer chips that enable the analysis of a wide range of frequencies. Furthermore, high-speed 12-bit analog-to-digital converters (ADCs) are employed to ensure accurate data conversion, and a fast Field-Programmable Gate Array (FPGA) is responsible for processing the large amount of data generated during measurements.
The custom six-layer printed circuit board (PCB) utilized in this build is substantial in size and features strategically placed cutouts designed for the directional couplers. These couplers utilize short lengths of stripped coaxial cable that are lined with ferrite rings, which are essential for effective signal isolation. To enhance the performance of the analyzer, Henrik ingeniously sandwiched the PCB within a two-piece aluminum enclosure, ensuring minimal interference between the various signal stages.
Before finalizing the design, Henrik took a prudent approach by 3D printing a prototype of the enclosure. This prototype was lined with aluminum foil to test both fit and functionality, allowing him to make adjustments prior to milling the final version. While he did encounter some signal leakage around the SMA connectors, a clever solution involving RF gaskets made from scraps of foil and solder braid quickly resolved the issue, further refining the build.
What truly stands out about this project is the impressive price point of just $300. While this cost is higher than that of popular models like the NanoVNA or its clones, many users would argue that the capabilities offered by Henriks VNA make it a worthwhile investment. The exceptional performance combined with a reasonable price tag positions this DIY VNA as a standout option for both hobbyists and professionals in the field of RF measurement.