
Mastering the Art of Fire: The Dakota Fire Hole Technique
An essential aspect of manhood has always revolved around the ability to navigate the world with competence and skill. Understanding how to handle various situations effectively is crucial. To aid in this endeavor, we will be republishing one of our illustrated guides from the archives each Sunday. This initiative aims to help you refine your traditional manly knowledge week by week.
Among the many survival skills, building a fire stands out as a fundamental practice, yet there are countless methods to achieve this, each suited for different circumstances. Today, we turn our attention to an ancient technique: the Dakota fire hole, particularly useful in scenarios where stealth is required, such as when evading a human tracker.
The Dakota fire hole has its roots in Native American tradition, where it was often employed by American Indians to create discreet and highly efficient fires. These fires were designed to burn cleanly, even in windy conditions, making them particularly beneficial for cooking without attracting unwanted attention. Unlike traditional bonfires that radiate heat and light for gatherings, Dakota fire holes are specifically tailored for moments when camouflage is paramount.
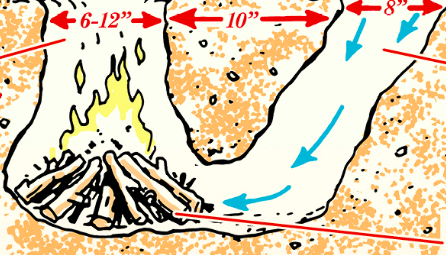
The construction of a Dakota fire hole involves creating two distinct holes that connect at their bases. The first hole is vertically oriented, while the second one is angled downward to link with the bottom of the first. When fire is ignited in the vertical hole, it draws air through the angled hole, supplying the fire with a concentrated source of oxygen. This efficient airflow means that only a minimal amount of fuelâsuch as twigs or pine conesâis necessary to sustain the fire's flames. Surrounding the top edge of the vertical hole with rocks creates the perfect surface for setting pots or pans for cooking, enhancing functionality.
Maintaining the fire is straightforward; additional twigs can be added to keep the flames alive, and you can manage the fire using a longer stick since the flames are only about a foot down and remain easily accessible.
In addition to the illustrated diagram provided, there are a couple of essential tips to remember when setting up an effective Dakota fire hole. First, it is vital to understand the direction of the wind, as you should position the air supply holeâyour second holeâon the side from which the wind is blowing. Wind direction can sometimes be easily detected; however, when conditions are calm, a simple technique can help: moisten your index finger and hold it up in the air. The cooler side of your finger will indicate the windward side.
Second, after excavating the dirt to create your holes, ensure to keep this soil set aside for backfilling when your fire is finished. This step not only extinguishes the fire completely but also helps to conceal any evidence that you had been there. If your digging disturbed any vegetation, such as grass or plants, take care to replace them afterward to enhance your concealment efforts.
If you found this illustrated guide helpful, you will surely enjoy our book, The Illustrated Art of Manliness. Itâs available for purchase on Amazon, providing a wealth of knowledge that will further enhance your skills and understanding.